Protective leg-wear can be an essential part of a good performance set up. Unfortunately, it can be hard to get the boots to behave. Adding a bit of wire helps them keep their shape around the leg, and in some cases will even keep them up without adhesive or sticky wax! The following tutorial is for a basic galloping boot fitted to Wee Jay.
Tools
Mini clothes pins
Exacto knife
Sharp Pointy Object TM (a large needle will work well)
Scissors
Supplies
Leather, skived into thin and VERY thin with enough for straps
32g wire
Glue (I use Tandy LeatherBond)
Note: This tutorial will walk you through one boot. Remember that you'll need to flip the pattern and some of the steps accordingly, and that galloping boots for the hind legs are generally a little taller. For the sake of time, this tutorial assumes that the user is familiar with the techniques for skiving and dyeing leather.
In
this photo, you get a good idea of the general shape of a brushing or galloping boot. These boots provide protection for the inside of the leg and offer some protection on all sides. They generally cover the inside of the ankle without restricting motion and are almost as long as the cannon bone itself. They are fastened with velcro tabs or buckles and straps, which are always on the outside of the leg facing back, to keep a horse from injuring itself. Our tutorial is made with leather tabs that would, in real life, velcro on. You could easily modify this tutorial to include faux buckle straps if you were so inclined.
We'll start out by cutting the general shape of a brushing boot to fit your horse, leaving both ends long. You can always take a little off, but it's much harder to add it back on.
 |
| Here you can see a finished boot (top) and the rough pattern (bottom) |
Wrap the boot around your horse's leg to check the fit, trimming at the top and bottom where necessary. It can be helpful to use your fingernail to leave an impression in the leather as a guide for trimming. Once done, use your fingernail or a needle to mark the long ends of the boot for trimming. This is best explained by a photo:
Since this is a blank resin, I used a needle to poke the leather right behind the cannon bone. The end of the leather will sit in the natural depression created by the musculature of the horse's leg and reduce bulk. Trim along those lines, and get ready to wire the boot.
If you haven't already, make sure your VERY thin leather is ready. This is the lining for the boot, and you'll want it to be dyed to match the exterior and sealed well. It needs to be thinner than the exterior of the boot, but not so thin that the ends of the wire break through.
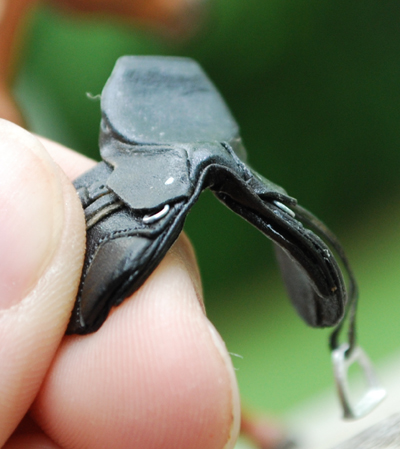
I used two strands of wire, but you could certainly use three if you felt so inclined. Make sure that the wires are inset slightly from the short end of the boot to prevent scratching, and use a pair of pliers to turn the ends in a very small hook shape. The photos don't show this, unfortunately, because I hadn't thought of that when i took these photos a few months ago! Leave 1/2 to 1 inch of wire (or whatever you're comfortable with) at the other end of the boot for handling and shaping later. Lay down your glue pretty heavily, place the wires, and cover with the lining leather.


Trim the excess lining away from the boot and, while the glue is still wet, wrap it around your horses leg to shape it. Wrap the excess wire around the boot as many times as possible to help it retain it's shape. If the lining begins to pull away from the outer shell, hold it in place until the glue sets or use a mini clothes pin to clamp it down. If your model has tucked up legs, like WeeJay, it can be easier and just as effective to shape the boot around a hind leg, where it's easier to reach. Use your finger to gently shape the area around the ankle so that it molds to the leg.

Once the glue has set well, usually less than 15 minutes, remove the boot gently and lay it flat. Trim the excess wire as close to the edge as possible and wrap the boot around your horse's leg again. It's very likely that the boot is far too long and the leather overreaches. Trim it back so that it falls about mid-way around the leg or a little shorter, but still overlaps the rest of the boot. The photo is of a finished boot, but you can see the slight overlap anyway.
I prefer to cut a small slit for each strap and glue them to the underside of the boot, but that can be difficult to do with this particular method. These straps are trimmed to a point and glued to the boot, using the tip of a needle to simulate stitching. When gluing the straps down, it's helpful to work with long sections of lace and trim all of the straps at once to keep them even. A mini clothes pin can be used as a clamp while the glue is drying.
Using some of the lining leather, trim a long strip that's roughly the shape of a tongue depressor. The rounded bottom should fit over the bottom edge of the boot, and it should be as wide. Real brushing boots often have a protective strip along the inside of the leg, covered by material. That's what this will be. Again, the general shape is best described with a picture:

On the left is the protective strip, next to it is the boot, and on the far right is a finished boot. Apply glue to the underside of the strip and place it over the boot. While the glue is still wet, use a needle or Sharp Pointy Object (TM) to stitch mark the leather. While marking, push the leather gently towards the center of the boot to give it some dimension and shape. You can see the effect (blurrily) in the photo above, and more clearly below, where four stages of construction are shown.
 |
| L to R: pattern, wire and lining, trimmed with tabs, and finished. |
Once you've stitchmarked the entire protective strip, your boot is done! One down, just three more to go. You can modify the design by using contrasting or colored leather or changing the size and number of tabs. Some boots use buckles, while others use large velcro tabs. Neither are hard to simulate with a little practice.
Good luck with your boots, and I'd love feedback on the tutorial as well as photos of your finished products!