One of the beautiful things about working from home is the ability to set your own hours. One of the horrible things about working from home is the ability to set your own hours. It's a blessing and a curse. Tack making happens all week long, before I go to my "real" job at the paper and usually after I get home, too. Saturdays especially are devoted to miniature saddles, the paperwork, or blogging. What can I say, I enjoy doing it! I declared yesterday a HOLIDAY, though!
I didn't worry about doing anything business related, though it snuck in a little bit. As part of a bit of room clean up I transferred my old files into new file folders. The day wasn't model-horse-free, either. I've mentioned before that we'll be doing some remodeling in a few weeks, and I started packing up in preparation. My room sits on a corner, and when two windows were replaced last year we discovered mold in the exterior drywall and insulation. This summer we'll rip those walls down to the studs and replace the insulation and drywall. We'll also finish trimming out the windows and repaint.
I packed up my models and all of my breakables last night. My room is now free of model horses. They're living in boxes in the spare bedroom until the remodel is completely finished. The resins have fleece pouches and are staying in my closet, away from cats and unwitting helpers who might put something heavy on their shoebox. When we start tearing down next week, I'll pack up my studio, too. I'll be without it for at least two weeks, possibly longer. I'll be accepting new orders once it's back up and running, though!
I'm going to get going on the saddle tutorial today, so never fear: there will be another update today or tonight with pictures!

Tutorial Progress
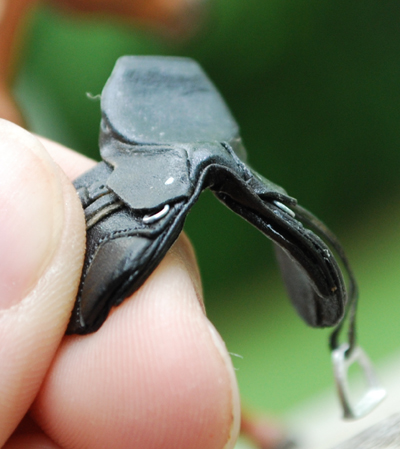
Last night I finished the first complete saddle based on the new tutorial pattern. I found some things that I want to tweak, but the pattern is sound! I'll adjust the pattern and write up my scribbled notes on the process today. The second test saddle will be started today, and I'll refine the directions and time myself as I go along. It could be ready for testing as early as Monday! Release to everyone will have to wait until I get feedback from my lovely test people and make any necessary adjustments, but I am beyond excited!
The black saddle was the first try. Since I hate making anything without a purpose, I added a couple of things during the process so that I can hang on to it for my personal show string. I'll probably include those things as optional steps in the tutorial.


Also in progress for my personal show string is a western show saddle. It's got the most extensive carving so far, and I'm pretty pleased with it. Of course I see things I wouldn't mind changing, but I can always sell it and make a new one for myself later.

The black saddle was the first try. Since I hate making anything without a purpose, I added a couple of things during the process so that I can hang on to it for my personal show string. I'll probably include those things as optional steps in the tutorial.

Also in progress for my personal show string is a western show saddle. It's got the most extensive carving so far, and I'm pretty pleased with it. Of course I see things I wouldn't mind changing, but I can always sell it and make a new one for myself later.

New Design & Finished Stuff
I have such original post names, don't I? I'm horrible at naming these things! Any time I try to think of something clever, I get a headache. If I DO think of something, it's usually stupid. So we're going to take the easiest route and name it something obvious, like "New Design & Finished Stuff". No surprises, just right out there telling you what's up.
A word on the new design...I hated the way that the old one(s) didn't really match my website. Most of my traffic comes from Jennifer Buxton's amazing blog (which I am insanely grateful for!), but for the few who venture over here from my website, I want a cohesive look. I finally found something that works, and I apologize to anyone who lived through the afternoon of playing around! I think I went through four or five designs and variations of them before I settled on this one, and those are just the ones you SAW!
Also, thanks for the response to the new tutorial! I'm plugging away at it, slowly, and hope to have it finished in the next month or so. There was a little hang up with the first test saddle...some genius *cough*me*cough* cut the stirrup keeper slots wrong and didn't notice until she was about to glue the seat on.
So after all that rambling, I guess you'd like to know what I finished, right? I could tell you...but showing is so much more fun!


These saddles are a trade with Kim Beecker of Total Image Equine for two paint jobs. Kim worked her magic on my Mindy and EquinArt cutting horse and I cannot WAIT to get them home!
A note on the english set: all but the bell boots are up there on their own power! If I do it right, the wire-reinforced galloping/splint boots don't require stickywax to stay on. As a tack maker I'm breathing a huge sigh of relief, so I can't imagine how happy those who show performance will be! I have the photos I need to do a walk through, just have to put it all together. Making the boots is REALLY simple, too!
There's a bit of a lag between orders right now, so I'm taking the opportunity to work on my personal show string. After my first live show experience in 2007 or 08, I wasn't very interested in trying it again. I caught the showing bug when I visited AHL last weekend and with an entire year to plan I think I can pull it off! Right now I'm working on a dressage saddle and a western show saddle. It's the most detailed carving I've done so far, and as long as I don't screw it up it should turn out nicely. More on those soon, though, probably tomorrow!
Coming Soon!
 |
| Progress on the first saddle made with the new pattern |
I'm updating my Stablemate Saddle Tutorial! Actually, I'm completely reworking it. I posted that poor thing back in 2007, almost four years ago. It's still pretty popular, apparently, despite numerous flaws. I looked it up today and it's got nearly 2,000 views over the course of four years on a pretty slow board.
This tutorial will be for the G3 Warmblood, but the G3s can share saddles. Right now I have the pattern done, I'm just testing it out and making notes during the creation. After I get the kinks worked out in the pattern and process(and I know they're in there), I'll make a second saddle and document the progress with photos and more notes. Once the text is written up, I'm going to pass this on to one or two hobbyists for a test run. That way I can have feedback on how well the instructions work and the overall friendliness of the project! I'll post the tutorial here, for sure, and likely copies on Fallen-Leaves and Blab. If it's popular enough, I may see if a hobby publication wants to pick it up, too.
If you'd like to test-run the tutorial, please drop me a line. 'Test pilots' need to be able to complete the tutorial in a timely manner, document how it went, and provide feedback on rough areas. You can send an email to akirby@dreamflitedesign.com or post in the comments if you're interested and I'll email a copy to you whenever it's done.
Western Saddle Blankets
Today, most of my studio time has been spent working on saddle blankets. Earlier this year, I experimented with printing them on fabric. It was a huge success, and I've had a few requests for them. The original designs were sort of thrown together, and I wanted to create a fresh set for some projects I have as well as sales. Since I'm waiting for leather to dry, I thought I'd talk a little about how I put them together.
First, a word on software. I design my blankets in Photoshop, but I suppose you wouldn't have to if you wanted to try this at home. Most real show blankets are in geometric patterns, so with some creativity and a steady hand I don't know why this wouldn't work in, say, Paint. It would be easier to do more complicated patterns in Photoshop or some equivalent, though.
In Photoshop, I create a sample pattern in a grayscale PSD that I can manipulate. Each element of the pattern is in it's own layer, which allows me to change the color quickly and easily. The photo below shows you my layers palette, the grayscale template, and a finished pad. Over each layer, I created a second layer that has been told to "group with previous," or CTRL + G for PC users. This means that I can use the paint bucket to dump a color on that layer, and all the elements of the layer it's grouped with will take on that color. Any transparent areas will stay that way. This is much faster than using the paint bucket to dump color in every little area.

Once the template has been built, it's all about playing with color! That's the funnest and hardest part. When I'm putting together a pad, I take a peek at what's winning in the real world and the model horse world. That helps me figure out what's popular right now. No matter what's "in" right now, Hobby Horse's color wheel is a great reference. It makes some awesome suggestions about what color families best compliment specific horse colors.
I'm trying to make sure that the sheet of blankets I'm putting together will have at least one blanket for every horse. I have five color palettes (for now!) that I'm using for the sheet of blankets I'll be selling. The colors in each palette are repeated in the three patterns that I'm offering. I don't think I'm explaining that well, so here's a screen cap of the sheet of blankets so far. The patterns run in rows, while the color groups are in columns.
 It can be challenging to repeat the colors and keep each set of three feeling like they belong together. Some colors work really well on one pattern, but it's hard to pull them into a different one. In some cases, I found it easier to drop a color all together on the other blankets. The blue/green ones (second from the left) are a good example. I just couldn't make the orange accent from the top pad work in the other two. I figured that was okay, though, since not everyone will want to make that much of a statement. Once I have the pad done, I save it as a JPG and insert it into a MS Word document. I'll print the pads on some inkjet printer fabric that I picked up at Hobby Lobby.
My original plan was to offer 15 blankets, as seen above. That's about half a sheet of fabric. I could fit another three rows below that, and I had planned to print out extras for myself. After messing with the margins in Word, I found that I can run these things six across and squeeze in eight rows. Now I'm desperately trying to come up with a sixth color palette and a fourth pattern! At $6 for four sheets, this fabric is not cheap. For my sake and the sake of my customers, I want to get as much mileage out of it as I can.
I hope you had fun seeing how I make these blankets. If you'd like to see how I do anything else, drop me a line in the comments! I'm always looking for ideas for the blog.
First, a word on software. I design my blankets in Photoshop, but I suppose you wouldn't have to if you wanted to try this at home. Most real show blankets are in geometric patterns, so with some creativity and a steady hand I don't know why this wouldn't work in, say, Paint. It would be easier to do more complicated patterns in Photoshop or some equivalent, though.
In Photoshop, I create a sample pattern in a grayscale PSD that I can manipulate. Each element of the pattern is in it's own layer, which allows me to change the color quickly and easily. The photo below shows you my layers palette, the grayscale template, and a finished pad. Over each layer, I created a second layer that has been told to "group with previous," or CTRL + G for PC users. This means that I can use the paint bucket to dump a color on that layer, and all the elements of the layer it's grouped with will take on that color. Any transparent areas will stay that way. This is much faster than using the paint bucket to dump color in every little area.

Once the template has been built, it's all about playing with color! That's the funnest and hardest part. When I'm putting together a pad, I take a peek at what's winning in the real world and the model horse world. That helps me figure out what's popular right now. No matter what's "in" right now, Hobby Horse's color wheel is a great reference. It makes some awesome suggestions about what color families best compliment specific horse colors.
I'm trying to make sure that the sheet of blankets I'm putting together will have at least one blanket for every horse. I have five color palettes (for now!) that I'm using for the sheet of blankets I'll be selling. The colors in each palette are repeated in the three patterns that I'm offering. I don't think I'm explaining that well, so here's a screen cap of the sheet of blankets so far. The patterns run in rows, while the color groups are in columns.

My original plan was to offer 15 blankets, as seen above. That's about half a sheet of fabric. I could fit another three rows below that, and I had planned to print out extras for myself. After messing with the margins in Word, I found that I can run these things six across and squeeze in eight rows. Now I'm desperately trying to come up with a sixth color palette and a fourth pattern! At $6 for four sheets, this fabric is not cheap. For my sake and the sake of my customers, I want to get as much mileage out of it as I can.
I hope you had fun seeing how I make these blankets. If you'd like to see how I do anything else, drop me a line in the comments! I'm always looking for ideas for the blog.
One Week From Today
One week from today, my second semester of college will be officially OVER! Yay! I'll have all of three weeks off before the summer interim classes start up, and I have BIG plans for those three weeks! I've still got to go to work, but it's only half days. Still plenty of time to get lots of work done!
My priority will be working through as many current orders as possible before the second week of June, when anarchy will reign in my house. That's the week currently set aside for completing the remodel of my room that was started over a year ago. We'll be tearing a couple of walls down to the studs, so my studio and collection will be packed up and moved to safety for the duration.
If I manage to get all of that done, I'm going to take a serious look at my prices. Right now I'm priced well below other mini tack makers and I've had several people mention that I should really raise them. I'm definitely planning to do that, and when I have it all sorted out I'll reopen my books. Once all of that is done, I've got a couple of boxes of OF Stablemates to sort through and sell. The amount of time and effort involved in photographing, describing, and listing 50 or more Stablemates is daunting, to say the least.
If I'm lucky, I'll make a little headway on some pleasure reading. I've picked up a few used books I'd like to read just for the heck of it. One of these days I might even get to pick up War and Peace again!
In "real" life, my new job is going so, so well. I can't even begin to describe how awesome it is. My boss is thrilled with how quickly I'm picking up the newspaper biz and the software they use. He keeps saying that I'm a "fish in water." Is that not the coolest thing ever?! Plus, I only spend ten minutes on the road instead of 40! I've been at work the whole week, and my gas gauge is still reading "Full."
Oh, right, pictures! Here's Heather's finished set for the pony. Please excuse the missing ear and tail...one was the post office's fault, the other mine.


Subscribe to:
Posts (Atom)